The Nikon Z 9 is a professional-grade mirrorless camera that has one of the most elaborate configuration menus to date. While each of us have different requirements as photographers and would benefit from different individual configurations, if you are wondering where to start please try these configuration changes I am sharing. Many of the Nikon mirrorless cameras have a similar configuration menu so many of these recommendations can also be used on other model cameras. Start off with these recommendations and feel free to customize them if necessary.
Charging Your Battery
Before we get into setting up your camera's configuration we should discuss power. The Nikon Z 9 ships with the Nikon EN-EL18D Rechargeable Lithium-ion Battery (10.8 V, 3300 mAh capacity). Nikon only rates this battery for taking around 700 photos before the battery should be assumed to be depleted. However, from my experience (and if I am being careful with how much I use the display) I expect to get about 4,500 RAW shots before depleting my battery, even with leaving the battery inserted inside the camera and with the camera turned on (the camera does go asleep fairly quickly to conserve power).
The Nikon Z 9 ships with the Nikon EH-7P Power Adapter (Input: 100-240 Volts 50-60 Hz 0.5 Amp and Output: 5V 3.0 A 15 W) and the Nikon MH-33 Battery Charger. The power apdater plugs into 100 to 240 volt household current and connects to the Nikon MH-33 Battery Charger with a USB-C cable hard-wired into the power adapter. Nikon does specify to "Use the product with an EH-7P charging AC adapter or AC adapters that support USB Power Delivery"
The MH-33 Battery Charger is designed specifically to charge EN-EL18D, EN-EL18C and EN-EL18B rechargeable Lithium-ion batteries. The EN-EL18D battery can be charged in the MH-33 Battery Charger or in the camera by both the EH-7P adapter or a high-quality USB PD adapter. Do not attempt to use older EN-EL18 battery chargers to charge the EN-EL18D battery.
When charging the battery in the MH-33 Charger, the batttery charges at roughly a 20-watt rate. When charging the battery in the camera, the battery charges at an approximately 15-watt rate. (These are all rates for a 50% depleted battery. Charging rates are lower when the battery is more fully charged.)
A PD Power Adapter outputs roughly 9 volts to the MG-33 and 20 volts to the camera. The EH-7P Power Adapter, however, only outputs 5 volts to both.
The Nikon Z 9 also ships with a Nikon UC-E24 cable, which has a USB-A connector on one end and a USB-C connector on the other end. Connecting this cable to a non PD-grade power supply, and then to the MH-33 Battery Charger, will not charge the camera battery. Connecting it to the camera also will not charge the battery.
Literature says that to charge the battery in the MH-33 Battery Charger (or while the battery is inside the camera) the Nikon USB Cable UC-E25 is required. I purchased one of these cables and was able to charge my battery while using a PD (Power Delivery)-grade power supply. However, I was also able to charge my battery with other USB-C PD (Power Delivery) cables which use the Power Delivery protocol, which cost about one-quarter of the price of the Nikon cable.
When I am out taking photos I prefer to carry a small power adapter that connects to my vehicle's power port or cigarette lighter in case I am on location somewhere and run into battery power shortages. When I am away travelling I also like to carry a multi-device USB charger which I can use to power my notebook computer and charge my camera battery, cell phone, and GPS device in a hotel room or airport waiting area from one outlet, since power outlets in some hotels and airport lounges can sometimes be scarce or in high-demand. I also like to carry a USB Power Bank to charge my camera battery and other devices when I am hiking or camping, and if I plan to be out in the wilderness for more than one day I carry a solar panel that I can hang from my backpack to recharge my power bank during the daylight hours (and I can use the power bank to recharge my devices at the end of the day at camp). Charging some devices with a solar panel while moving in and out of the shade can be difficult, while charging a power bank is more reliable.
These are the charging devices I carry which work with the Nikon Z 9's battery:
In-Vehicle Charging
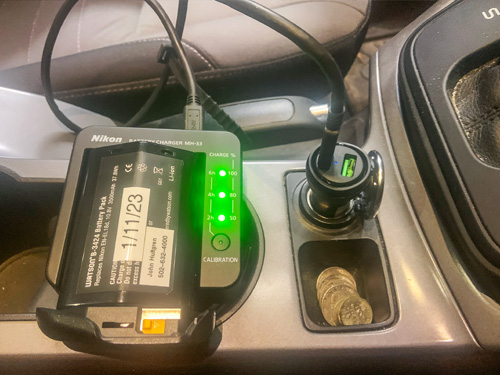
Photo: The Spigen USB-C Car Charger Adapter with the Nikon UC-E25 USB Cable charging the EN-EL18D battery in the Nikon MH-33 Charger.
I have found that the Spigen USB-C 45E Dual Port Car Charger Adapter (PD Charging at 27W and Quick Charging at 18W), along with a Nikon UC-E25 USB Cable, will power the battery charger and it will also charge the battery in the camera. I have also tried other PD-rated USB-C cables with success. With the additional USB-A port I can also charge my cell phone and GPS device while the camera battery is charging. I would imagine that similar chargers rated at least at 20 watts PD Power Delivery, while using a PD-rated USB-C cable, would also work.
Having a way to charge a Nikon camera battery while away from household current is a wonderful enhancement for us photographers who spend a lot of time in the outdoors.
Multi-Device USB Charging
When I am traveling I often find that some hotels have a serious shortage of power outlets in the room. And an unused power outlet in an airport can sometimes be very hard to find (and frequently there is a waiting line). So I like to carry a relatively small Multi-Device USB Charger in my computer bag that only requires one power outlet.
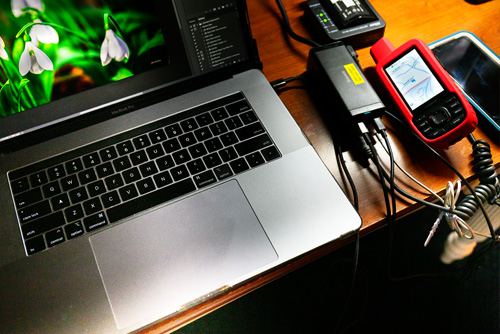
Photo: A Baseus PowerCombo 100 Watt USB-C Charger plugged into a Nikon MH-33 Battery Charger with the Baseus included cable, a Baseus 100W PD 5A QC 4.0 Fast Charging USB C to USB C Cable plugged into a 2018 15-inch MacBook Pro, a USB-A to Lightning Connector cable plugged into an iPhone 10 XR cell phone, and a USB-A to Micro USB cable plugged into a Garmin GPSMAP 66i GPS and Satellite Messaging Device, charging all four devices at the same time from one power outlet.
The Baseus PowerCombo 100 Watt USB-C Charger is available with various wattages. I chose the 100 Watt charger because my 2018 Macbook Pro requires an 87-Watt USB-C Power Adapter which uses USB Power Delivery 2.0 for charging. While my notebook computer does not always require this amount of power (particularly if all I am doing is editing photos), I anticipated that the 100-Watt power supply would be able to charge all of the items that I would be using while on the road.
This charger is a PD-rated charger with four ports (two USB-C and two USB-A). For the USB-C ports I am using PD-rated cables.
Portable Power Bank
When I am hiking I like to carry a portable power bank and some cables in case any of my essential devices (camera, GPS Messaging unit, or cell phone) need to be recharged. While all of my devices should have at least two days worth of power, things happen (devices break down or delays due to weather or illness or injury occur). You should always plan on expecting the unexpected.
viewingWhile many power bank devices come with a small solar panel, these solar panels are not large enough to be very powerful (particularly since many mountain trails are shaded). I always start off with a fully charged power bank and I should have enough power to recharge my GPS unit a few times. Since I only take about 20-40 photos a day while I am hiking, my camera battery should last a few weeks if I am careful and minimize viewing my photos on the camera's display. If I am planning to be gone longer than two days I also carry a larger 10-watt solar panel that I can hang from my backpack which I use to recharge the power bank during the day, and then use the power bank to recharge my devices at night.
The device I carry that requires the highest capacity charge is my camera battery, which requires a PD-powered charger. When charging the battery in the MH-33 Charger, the batttery charges at roughly a 20-watt rate, and when charging the battery in the camera, the battery charges at an approximately 15-watt rate. The device that I carry which will require the most frequent charging is my GPS Satellite Messaging Device, which will require charging every day or two but this device is USB-A and does not require a PD-grade charger. Therefore, my portable power bank should be large enough to recharge my camera battery, PD-rated at 20 watts minimum and, to be allowed on commercial aircraft, must not be larger than 100 watt hours.Portable power banks and other batteries have some restrictions when carried on commercial aircraft (see above).
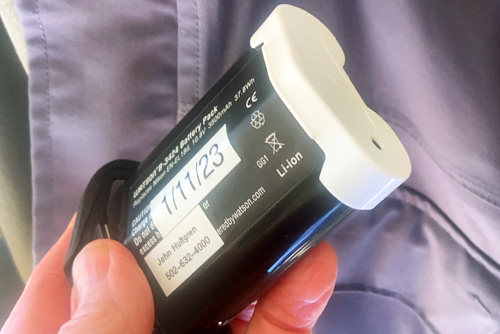
Photo: An aftermarket EN-EL18D spare battery removed from carry-on luggage and carried with the passenger on a commercial aircraft. The batttery's 37.8 watt hours, which is under the FAA limit of 100 watt hours, is clearly printed on the battery. The battery appears undamaged on inspection and the terminals are covered and protected. Any additional spare batteries, and any power bank device, must also be similarly carried by the passenger.
Battery size limits: Lithium metal (non-rechargeable) batteries are limited to 2 grams of lithium per battery. Lithium ion (rechargeable) batteries are limited to a rating of 100 watt hours (Wh) per battery. These limits allow for nearly all types of lithium batteries used by the average person in their electronic devices. With airline approval, passengers may also carry up to two spare larger lithium ion batteries (101–160 Wh) or Lithium metal batteries (2-8 grams). This size covers the larger after-market extended-life laptop computer batteries and some larger batteries used in professional audio/visual equipment.
The Nikon EN-EL18D battery is rated at 35.64 watt hours, which is under the FAA limit for carrying on a commercial aircraft. If you carry a Power Bank, that device must also be under 100 watt hours (or under 160 watt hours with airline approval but limited to a total of two spare batteries) if you intend to travel with your power bank on a commercial aircraft.
Battery quantity limits: None for most batteries — but batteries must be for use by the passenger. Batteries carried for further sale or distribution (vendor samples, etc.) are prohibited. There is a limit of two spare batteries per person for the larger lithium ion batteries described above (101–160 watt hours per battery).
Batteries must be carried in a manner that protects them from damage.
Battery terminals (usually the ends) must be protected from short circuit (i.e., the terminals must not come in contact with other metal). Methods include: leaving the batteries in their retail packaging, covering battery terminals with tape, using a battery case, using a battery sleeve in a camera bag, or putting them snugly in a plastic bag or protective pouch.
See the regulation: 49 CFR 175.10(a)(18)
Damaged or recalled batteries and battery-powered devices, which are likely to create sparks or generate a dangerous evolution of heat must not be carried aboard an aircraft (e.g. carry-on or checked baggage) unless the damaged or recalled battery has been removed, or otherwise made safe. The airline may offer further public guidance on transporting individual recalled products.
Newer lithium ion batteries have the Wh rating marked on them. To calculate Wh, multiply the battery voltage by the Amp hours (Ah).
When I am in the wilderness I always carry a flashlight/lamp that is powered by a hand crank. This device can also provide a small amount of rechargeability to essential devices if needed in an emergency. Being prepared for emergencies, with multiple backups, is important when you are out in the wilderness.
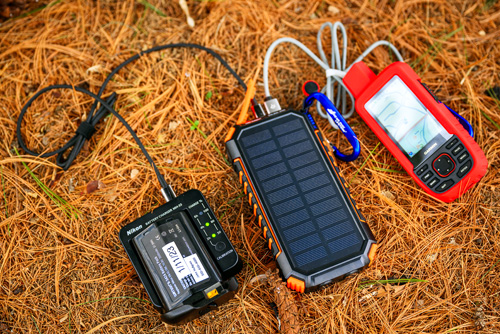
Photo: The Riapow Solar Power Bank with flashlight, that is water resistant and drop resistant, is outdoors charging my Nikon EN-EL18D camera battery and Garmin GPSMAP 66i GPS and Satellite Messenger device. This battery pack is a 26,800 mAh wireless portable charger with one USB-C and two USB-A ports that is rated at 99 watt hours, so it can be carried by a passenger on commercial flights, and can charge my GPS device or camera battery eight times. The battery pack is connected to the MH-33 battery charger by a 100-watt USB-C High Speed Data Transfer Fast Charging Cable.
The Riapow Solar Power Bank, when fully charged, can charge my EN-EL18D battery 8 times or it can charge my Garmin GPSMAP 66i GPS and Satellite Messaging Device 8 times. The GPS device has the shortest batttery lifespan, just under two days, while my Nikon battery should last a month if I take less than 150 photos a day and I am careful with how much I use the display. So I expect my power bank to last about 12 days when recharging my GPS device nightly before my power bank's charge is depleted.
The power bank's solar panel is small and during peak sunlight it will take about 80 hours to fully charge the power bank. Normally while hiking one is mostly in the shade and not in peak sunlight, and there are rainy and overcast days on the trail, so the power bank's solar panel cannot be expected to keep up with power consumption and I would expect to have a fully depleted power bank battery in about 12 days. Therefore, for hikes longer than a few days I also carry a Goal Zero 10 watt solar panel that I can hang from my backpack while it is plugged into my power bank with a standard USB-A to USB-C cable, charging the power bank during the day while I use the power bank to recharge my devices at night. The 10 watt solar panel can charge the power bank in about 15 peak sun hours, so with normal hiking use I can expect the 10 watt solar panel to recharge the power bank in four or five days depending on weather and terrain.
Working With Raw Files in Adobe Lightroom Classic
For a Nikon Z9 in Lightroom, most photographers recommend using the "Camera" profile instead of the Adobe profile, as it provides a more accurate starting point for editing by utilizing the color profiles embedded directly from the camera, resulting in a closer match to what you saw when taking the picture. This profile also does a much better job at eliminating noise when using a higher ISO.
To select a camera profile during import in Adobe Lightroom Classic, go to Edit > Preferences, then navigate to the Presets tab. In the Raw Defaults section, for Global select "Camera Settings" and check the box for "Override master setting for specific cameras" to choose a profile based on your camera model when importing images. For Camera, "Nikon Z 9" should be selected and for Default, make sure "Camera Settings" is selected.
Set your global preferences in Lightroom Classic by going to Preferences | Presets and under Raw Defaults set the Global dropdown to "Camera Settings."
Function Keys
The Nikon Z 9 has four programmable function keys, three on the front of the camera and one on the back of the camera. Many of the menu items can be programmed to these four keys. This makes certain functions readily available.
But which functions should you program? Well, certainly any four that you would like. But if you don't know where to start, feel free to use the four that I use (and feel free to change any to fit your shooting style as you better learn your Nikon Z 9).
F1 Key: "Cycle subject detection options" allows quick toggling of detection modes (Auto, People, Animals, Birds, Airplanes, Subject Detection Off)
To program this feature,
F2 Key: Rule Of Thirds Overlay.
The Rule of Thirds is a very common and popular composition rule. Nikon gives you the choice to use numerous overlays that you can see over your scene in your viewfinder or on the display panel. The first step is to pick the correct overlay for the Rule of Thirds.
Once we have selected the grid that we wish to overlay you need to assign it to the Fn2 button.
F3 Key: Virtual Horizon Overlay.
Nikon provides a virtual horizon overlay that shows you when your photograph is level.
F4 Key: My Menu.
When you press the Menu buttton on the back of the camera, the display shows you the camera's configuration menu. There are multiple pages and the last page is named "My Menu," My Menu by default is empty and you can link to up to 20 configuration items that you frequently use to make these items easier to find. Instead of pressing the Menu button and then navigating to the last page, I find it helpful to assign My Menu to the Fn4 button on the back of the camera so that it is easier to open.
MY MENU includes selections that allows you to add, remove, and reorder items to MY MENU. I recommend adding the following items:

Pre-Release Burst Mode
Pre-Release Burst Mode allows you to photograph events that are hard to manually capture, such as lightning strikes or sudden wildlife movements.
After you set up Pre-Release Burst Mode in the Custom Settings Menu (see below), when you depress the focus button for a full second, the camera will buffer 30 frames before you depress the shutter button. Pressing and holding the shutter button will capture 30 frames per second while you are holding the button in addition to the 30 frames that were buffered while you were holding your focus button before you pressed your shutter button.
For example, if you are trying to capture a lightning strike (which is nearly impossible to predict and capture), you would hold your focus button buffering 30 images per second for however long it took until you witnessed the lightning strike. Then, as soon as you realized lightning was striking, you would depress your shutter button and hold that button down for up to four seconds, capturing up to five seconds of the lightning strike sequence.
To use Pre-Release Burst mode, set the advance mode dial on the top left of the camera to the bearded rectangle and then hold the top left button with the same bearded rectangle icon and turn the top rear control dial to select 30 FPS from the various advance modes.
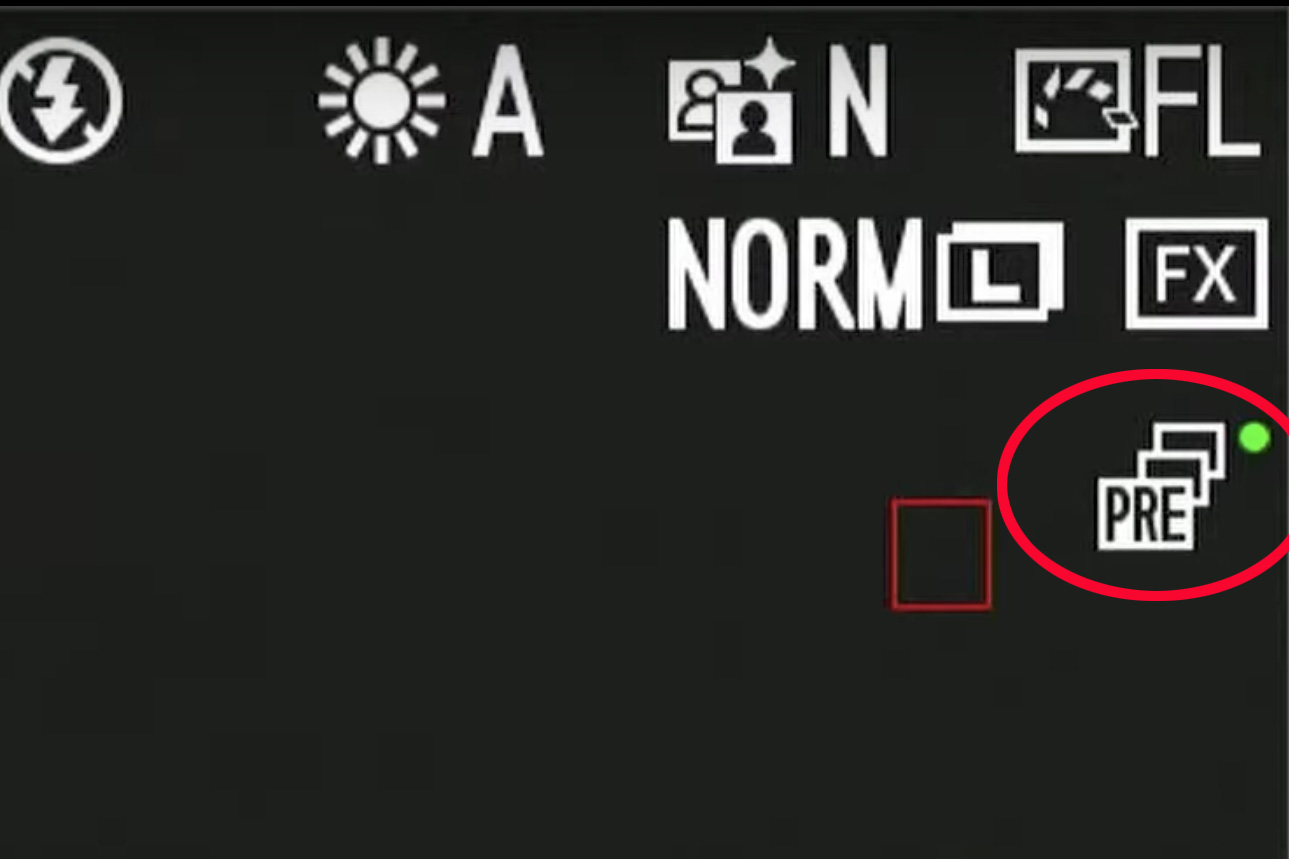
When activated the Pre mark will be visible in the upper right side of your display screen (it will also be visible along the center of the bottom row in the viewfinder). When you press your focus button you will see a green light next to the Pre mark, indicating that your camera is buffering. After about 30 seconds the green light will turn into an exclamation point indicating that the camera is no longer buffering. Release your focus button to clear the exclamation point and then press the focus button again to resume buffering.
The C-30, 60, and 120 modes only shoot in JPEG mode when you use the pre and post release burst modes. With C-30 you can capture in Fine JPEG mode.
Best Autofocus Setting For Capturing Birds In Flight
Capturing birds in flight can be challenging. The Nikon Z 9 offers many autofocus settings and, in my opinion, some work better than others for capturing birds in flight.
Since birds in flight is all about action, I recommend setting the focus mode to AF-C. Press the I button on the back of the camera.
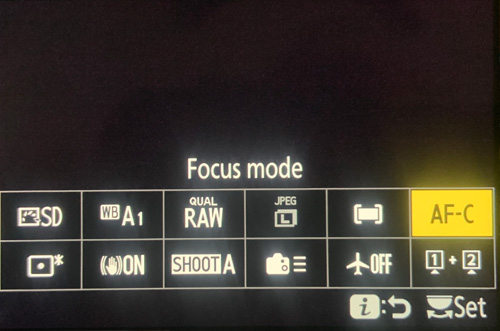
Scroll to the Focus mode selector and press the OK button.
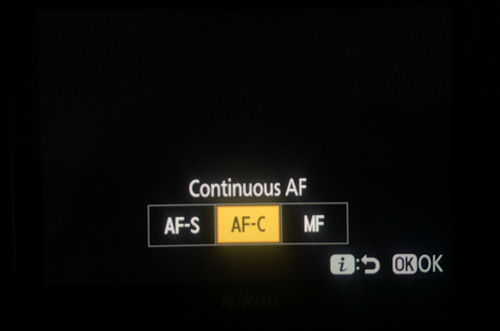
Scroll to AF-C (Continuous Autofocus) and press the OK button.
Next, select the autofocus mode. Wide Area Large Autofocus seems to work best for me when shooting birds in flight.
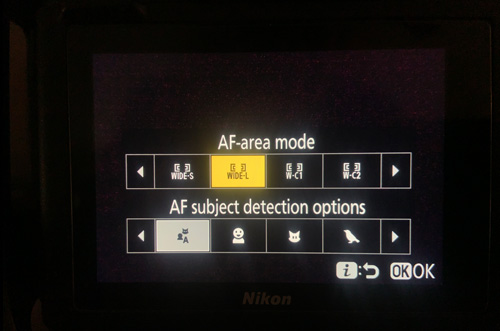
To select Wide Area Large Autofocus, press the I button on the back of the camera, scroll to the focus mode selector and press OK, scroll the top AF Area Mode selector to WIDE-L and press OK. Move the focus box as needed.
While Wide Area Large Autofocus works very well for birds in flight, you have to position the autofocus box and there may be times when you are unable to predict where the bird you want to photograph will pop up. Auto mode is a good backup mode for those situations. The only problem with Auto mode is you dont always know what Auto Mode is going to aqcuire so you run the risk of missing your bird in a fast-paced environment.
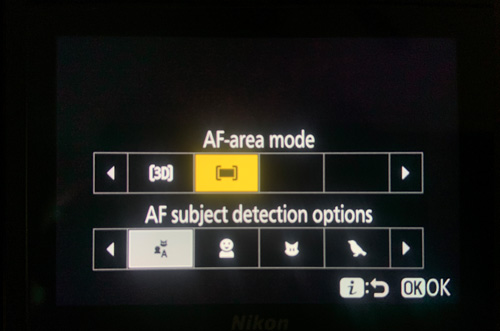
To select Auto Autofocus mode, press the I button on the back of the camera, scroll to the focus mode selector and press OK, and scroll to the top AF Area Mode selector to Auto Autofocus and press OK.
For situations where you don't know where the subject will enter the frame, Auto Autofocus may be your best choice.
Subject detection in the Nikon Z 9 is very smart and it helps your camera to automatically decide what subject in your frame to focus on. When a subject is detected, the camera will automatically jump to the most important part of that subject (such as the eyes). When using Wide Area Autofocus, you have to place the box where the subject is going to be but you then let the camera identify the subject within that box and then let the camera focus on the subject's eyes (even if the subject's eyes are not within the selection box).
To activate subject detection, press the I buttton on the back of the camera, scroll to the focus mode selector and press OK, and scroll to Focus Mode and on the bottom line select your type of subject detection you wish to use. The first option is Auto Subject Detection, which allow the camera to identify what it believes to be the subject. This works well but in some situation you may want to instruct the camera to narrow what the camera identifies as subjects. You can narrow the subject down to people, animals, birds, vehicles, aircraft, or turn subject detection off.
Using An External Microphone
While you are in video mode, pressing the microphone button on the back of the camera below the display and rotating the rear command dial allows you to disable audio recording (turn the microphone off), select "auto" to adjust sensitivity automatically, or choose a setting between 1 and 20 to adjust the microphone's sensitivity. If the sound level is displayed in red, the volume is too high and you should reduce the microphone sensitivity.
Camera Configuration Settings
The Menu button on the back of the camera opens the camera's configuration settings. These are the settings that I recommend that you immediately confirm or change. Of course, you may decide to select another option, either as you are setting your camera up or at a later time after you have had a chance to experiment with your settings. There is no one correct way to set your camera's configuraiton.
Menu Banks
Menu banks allow you to set up the Nikon Z 9’s menu in different ways for different types of photography. There are four menus that can be labeled different ways (such as landscape, wildlife, portrait, macro, etc.) that can allow you to switch between them quickly based on what subject you’re photographing. Within these four banks there are shooting menu banks and custom settings banks, along with an option in the photo shooting menu called “Extended menu banks.”
Many of the basic camera settings can be found in the Photo Shooting Menu, and most of these items are saved to your Shooting Menu Bank.
To save a Shooting Menu bank, first go through the entire Photo Shooting Menu and set everything up like you want it for that bank. I create a "Landscape" Shooting Menu Bank where I set focus to AF-S, turn off Auto ISO and set ISO sensitivity to 64 and turn on long exposure noise reduction. Once you have everything in the menu set up, go to "Shooting Menu Bank" at the top, click right, and then save or rename your bank.
For my four Shooting Menu banks, I rename "A" to "Landscape" and rename "B" to "Action." I use C as a backup for Landscape and D as a backup for Action since there is no way to restore your original values, so if you never change C and D you can easily restore Landscape from C and Action from D quickly and easily.
For my Action Shooting Menu Bank I set focus to AF-C and turn on Auto ISO.
By default, Shooting Menu Banks don’t include exposure information such as shutter speed, aperture, or flash settings. But if you turn on extended menu banks, then all of this exposure information is also saved in your banks. Remember that Nikon’s menu banks don’t revert to the values you originally saved when you set up your Shooting Menu Bank, so once you change a setting, your camera will go back to the last used exposure setting for that bank. Because of this behavior I don't use the extended menu banks, but some photographers may prefer to use them.
The last option for menu banks is the Custom Settings menu. Here you have four bank options for the Custom Settings menu which do not need to be associated with your Shooting Menu banks, although I prefer to keep my Custom Settings banks aligned with my Shooting Menu Banks for simplicity's sake.
How To Set the Nikon Z9 for Continuous Autofocus
The Z9 has many autofocus choices that can improve your focusing.
If you haven't already, consider switching over to back button focus (explained above). This step alone will greatly affect your ability to properly focus your images.
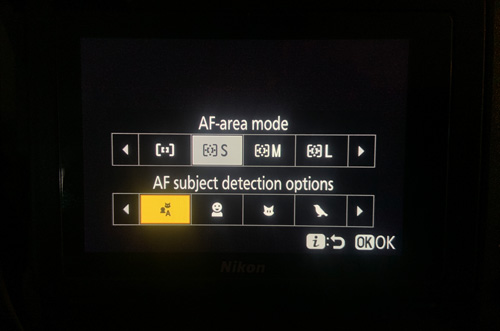
I have found that I prefer to use Wide Area AF (C1 or C2) with a custom focus box size that I set to be quite large. I keep “AF subject detection options” in the Photo Shooting menu set to Auto. If automatic subject recognition is not working well because of the lighting or for subjects not in the camera's subject recognition database, I switch over to 3D-tracking autofocus. 3D tracking can also fail in difficult lighting conditions so then I switch over to Dynamic-Area AF. I set AF-C priority selection to “release,” focus tracking with lock-on to 3, subject motion to steady, and focus point wrap-around off.
MENU | PHOTO SHOOTING MENU
MENU | VIDEO RECORDING MENU
MENU | CUSTOM SETTINGS MENU
MENU | SETUP
MENU | PLAYBACK MENU

 ADVERTISEMENT